Another wonderful idea I got on pinterest.com (find me!) using washers to make pendants. so easy, so fun, and I've worn them many times already!
You need...
Scrapbook paper
Scissors
Mod Podge
Washers (4 pk or 3pk for $0.97 at Walmart)
Triple Thick Diamond Glaze ($1.99 at Michaels)
Beads (optional)
String of your choice (I bought hemp)
Ok, now the fun part! (and easy part!) Trace the washer onto your favorite scrapbook paper and cut out--you'll need a front and a back). Now, Mod Podge the paper to your washers and trim as necessary. Now, liberally apply the Triple Thick glaze to one side and let dry (about 12 hours--i know, so long when you are waiting on something!) Then, flip over and glaze the other side (although I did not on the first 2 I made because I was too excited and just wanted to wear it! Once dry, cut the cord, leather, hemp, string you chose to the length youd like, giving a little extra room for tying off. Loop the string through the hole in the washer (youll be able to see how I did it in the picture to follow) I then added a wooden bead, sliding it all the way down to sit on top of the washer, and knotted the end. And there you have it! A super cute necklace that costs only a dollar or 2 (well...depending on your string choice--i started with a $2.40 pack of string that I only got 2 necklaces out of, but today bought a $4 ball of hemp that I should get good use out of!) I also found today some Shell Pendants on sale at Michael's for $2.99 that the washers will fit inside of, so Im going to try to pair a couple for a different look! Possibilities are endless! If you try some, please share with me!
Here are the pictures....
Well...I was on pinterest.com and found this idea. It was instructions on how to take a portrait and turn it into an amazing portrait on cavas to hang on your wall. It was so easy and I absolutely LOVED it. I can't wait to do more! (again--NOT my original idea)
What you need:
A canvas of any size. (I used 11x14...on sale 2 pk for 7.99 with a 50% off coupon = I paid $3.99!!)
A photo of your choice. (I took my memory card and brought it to Walmart and printed an 11x14 poster size photo for $5.50--it was a color picture, but I chose to print in black and white)
Glue. (I tried tacky glue--but had to go back with super glue)
Mod Podge
Brush (I used a foam brush--got 20 for a $1 at Michaels)
Black Paint
What you do:
Ok, first, paint the edges of the canvas whatever you choose. I used black acrylic paint. Then put the glue on the canvas and lay your photo down, pressing gently to smooth out any bumps or bubbles and let dry a few minutes. Next, check to see if there are any areas hanging over the edge that you need to trim. I did not but it may happen. Now take the modpodge and spread it liberally across the photo with the foam paint brush. I spread the modge podge going in one direction--across the photo as opposed to up and down. And it is OK to use a lot...remember, mod podge dries clear! Now, of course let that dry. Once that is dry, you can take a sponge, cloth, or another foam brush and apply the color of your choice, I used black because it was a black and white photo--and dab the corners of the picture to blend it into the sides of the canvas. The BEST part of this part is, since there is mod podge on the photo you virtually can NOT mess it up--if you put paint down and want to fix it, simply wet a cloth and wipe it away! its that easy! And ta-da...you have a great portrait on canvas to hang on your wall!!
I was so impressed with this project and fell in love with making these. I made one for my sister for her birthday using a photo of my niece, Kourtney.
Here is the photo I used....
This is the final product:
I have been trying to incorporate a science experiment in my morning circle with my students at least once a week & I have tried all kinds! Some...did NOT hold their attention. Of course, they are 3-5 years old. Why would they care to compare the feeling of different items? But others, had them clapping and cheering in their seats & made me laugh to myself. Which ones got that reaction? The most simple experiments which had them guessing what the outcome would be.
First one....Layering liquids to make a "rainbow" in a jar.
I took a small glass container and brought in 4 plastic cups filled with my mystery rainbow ingredients. First, I poured into the glass container some Karo Light Corn syrup with which I mixed in blue & red food coloring to make purple. I then asked the children what they thought would happen if I poured in some blue dish soap. Most guessed it would sink or mix. To their surprise, I poured it in, and it floated on top! So next up, some green water. Again, I asked them what they thought would happen and they all shouted out similar sinking & mixing answers....waiting impatiently for me to pour it in. While waiting I noticed they all were sitting right in their seats in circle, fixated on the jar. It was nice to see them all focusing and involved! So, in went the water...and it sat right on top of the dish soap. So now I had 3 layers. Lastly some yellow vegetable oil! that went in and I held up or rainbow (missing some orange and red) and they all cheered and clapped and asked me to walk around and show them. It was a great activity for them because they did not know what would happen and were so excited to find out what was to come. I loved it, they loved it and I was so happy it went well!
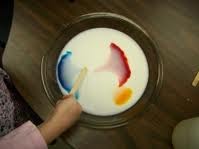
Second one....Exploding Milk!
For this one I poured some milk into a shallow round pan, maybe half an inch worth. And dropped in various colors of food coloring spread out throughout the milk. Then I took out my milk exploder....my dish soap. I asked the children what they think would happen if I dropped some dish soap in. I got lots of answers! Many about sinking, floating, disappearing. So....I had them all lay on their bellies and get ready to watch....and dropped a drop in, right in the middle of the pan. As I did the food coloring drops flew across the pan and started swirling around. They never mixed, the colors stayed very distinct and it looked great! They loved it and even asked a very scientific question "Kristin! What will happen if we put in ANOTHER drop??" So we tried it, observed, talked...they all cheered and clapped and were all smiles. It was a great experiment because they had no idea what to expect and the element of surprise kept them right with me the whole time!
These are great because not only are they great for school, but they are both using things that can be found at home! Here are a couple of photos....(not from mine unfortunately, just google images to give you an idea.)


I had previously posted about this....Re-Purposed T-shirt Headbands <3 and said I would give it a try, given the rainy cold New England day I see outside my window, I finally gave it a shot. And....drum rollll....I love it! This is such a GREAT project and it is so EASY! It did not take very long and the directions were fabulous and followable for any skill level. I would however, recommend you do use a thick, smooth, classic t-shirt. I tried to use a black, finely ribbed, thin shirt I had laying around and it came out great, but I dont think it looks as great as a nice thick, smooth tee would have! Here are pictures of mine....I cant wait to try more!